数据库的高可用方案我们通常采用的是双机热备模式,一个机器跑主机,另一个机器进行standby。当发生故障的时候,故障机上的数据库被切换到备机,在备机上起浮动IP和数据库,对应用来讲是透明的,只是发生了短暂的切换。目前行业中常用的高可用软件如HP的Service Guard、IBM的HACMP,价格都不低。在这里,我们可以使用oracle的crs application failover来实现同样的保护,而且更重要的是:crs免费。
本文的配置为:Linux AS4 U5+Oracle 10.2.0.0.1+ASM存储。(看不到图的同学请见这里《如何看到本站的图片》)
先说一下磁盘的规划:
|
1 2 3 4 5 6 7 8 9 10 11 12 13 14 15 16 17 18 19 |
/dev/sda1 /dev/sda2 /dev/sda3 合计20G,用作根挂载点、swap空间和其他文件系统的空间 /dev/sdb1 256M,用作ocr /dev/sdb2 256M,用作votingdisk /dev/sdc1 3G,用作asm diskgroup1 /dev/sdd1 3G,用作asm diskgroup1 /dev/sde1 2G,用作asm flash recovery area |
一、 系统配置:
等操作系统安装完毕后,进行一下参数的配置。
1. 建立oracle用户和设置密码:
# groupadd oinstall

# groupadd dba

# mkdir -p /export/home/oracle /ocfs

# useradd -d /export/home/oracle -g oinstall -G dba -s /bin/ksh oracle

# chown oracle:dba /export/home/oracle /u01

# passwd oracle

New Password:

Re-enter new Password:

passwd: password successfully changed for oracle
2.建oracle用户的环境变量:
# vi /export/home/oracle/.profile

export PS1="/bin/hostname -s-> "

export EDITOR=vi

export ORACLE_SID=hadb

export ORACLE_BASE=/u01/app/oracle

export ORACLE_HOME=$ORACLE_BASE/product/10.2.0/db_1

export ORA_CRS_HOME=$ORACLE_BASE/product/10.2.0/crs_1

export LD_LIBRARY_PATH=$ORACLE_HOME/lib

export PATH=$ORACLE_HOME/bin:$ORA_CRS_HOME/bin:/bin:

/usr/bin:/usr/sbin:/usr/local/bin:/usr/X11R6/bin

umask 022
3.创建文件路径:
mkdir -p $ORACLE_BASE/admin

mkdir -p $ORACLE_HOME

mkdir -p $ORA_CRS_HOME

mkdir -p /u01/oradata/hadb
4.设置shell limited:
# vi /etc/security/limits.conf

oracle soft nproc 2047

oracle hard nproc 16384

oracle soft nofile 1024

oracle hard nofile 65536
# vi /etc/pam.d/login

session required /lib/security/pam_limits.so
# vi /etc/profile

if [ $USER = "oracle" ]; then

        if [ $SHELL = "/bin/ksh" ]; then

                ulimit -p 16384

                ulimit -n 65536

        else

                ulimit -u 16384 -n 65536

        fi

fi
5.设置核心参数:
# vi /etc/sysctl.conf

kernel.shmall                = 2097152

kernel.shmmax                = 2147483648

kernel.shmmni                = 4096

kernel.sem                   = 250 32000 100

fs.file-max                  = 65536

net.ipv4.ip_local_port_range = 1024 65000

net.core.rmem_default        = 1048576

net.core.rmem_max            = 1048576

net.core.wmem_default        = 262144

net.core.wmem_max            = 262144
6.设置hosts文件:
# vi /etc/hosts

# Do not remove the following line, or various programs

# that require network functionality will fail.

127.0.0.1       localhost

192.168.190.142   hadb02.mycorpdomain.com hadb02

192.168.190.141   hadb01.mycorpdomain.com hadb01

192.168.190.41    hadb01-vip.mycorpdomain.com     hadb01-vip

192.168.190.42    hadb02-vip.mycorpdomain.com     hadb02-vip

10.10.10.41     hadb01-priv.mycorpdomain.com    hadb01-priv

10.10.10.42     hadb02-priv.mycorpdomain.com    hadb02-priv

# ntp server

191.168.190.1 HEJIANMIN
7.设置hangcheck timer:
#vi /etc/modprobe.conf

options hangcheck-timer hangcheck_tick=30 hangcheck_margin=180
为了立即生效,执行:
# modprobe -v hangcheck-timer

insmod /lib/modules/2.6.9-42.0.0.0.1.ELsmp/kernel/drivers/char/hangcheck-timer.ko hangcheck_tick=30 hangcheck_margin=180
8.配置ntp服务:
ntp的配置请见此文《ntp服务的安装》
9.用fdisk对磁盘进行分区:
|
1 2 3 4 5 6 7 8 9 10 11 12 13 14 15 16 17 18 19 20 21 22 23 24 25 26 27 28 29 30 31 32 33 34 35 36 37 38 39 40 41 42 43 44 45 46 47 48 49 50 51 52 53 54 55 56 57 58 59 60 61 62 63 64 65 66 67 68 69 70 71 72 73 74 75 76 77 78 79 80 81 82 83 84 85 86 87 88 89 90 91 92 93 94 95 96 97 98 99 100 101 102 103 104 105 106 107 108 109 110 111 112 113 114 115 116 117 118 119 120 121 122 123 124 125 126 127 128 129 130 131 132 133 134 135 136 137 138 139 140 141 142 143 144 145 146 147 148 149 150 151 152 153 154 155 156 157 158 159 160 161 162 163 |
[root@hadb01 ~]# fdisk /dev/sdb Command (m for help): n Command action e extended p primary partition (1-4) p Partition number (1-4): 1 First cylinder (1-512, default 1): Using default value 1 Last cylinder or +size or +sizeM or +sizeK (1-512, default 512): +256M Command (m for help): n Command action e extended p primary partition (1-4) p Partition number (1-4): 2 First cylinder (246-512, default 246): Using default value 246 Last cylinder or +size or +sizeM or +sizeK (246-512, default 512): +256M Command (m for help): Command (m for help): p Disk /dev/sdb: 536 MB, 536870912 bytes 64 heads, 32 sectors/track, 512 cylinders Units = cylinders of 2048 * 512 = 1048576 bytes Device Boot Start End Blocks Id System /dev/sdb1 1 245 250864 83 Linux /dev/sdb2 246 490 250880 83 Linux Command (m for help): w The partition table has been altered! Calling ioctl() to re-read partition table. Syncing disks. [root@hadb01 ~]# [root@hadb01 ~]# [root@hadb01 ~]# fdisk /dev/sdc Command (m for help): p Disk /dev/sdc: 3221 MB, 3221225472 bytes 255 heads, 63 sectors/track, 391 cylinders Units = cylinders of 16065 * 512 = 8225280 bytes Device Boot Start End Blocks Id System Command (m for help): Command (m for help): n Command action e extended p primary partition (1-4) p Partition number (1-4): 1 First cylinder (1-391, default 1): Using default value 1 Last cylinder or +size or +sizeM or +sizeK (1-391, default 391): Using default value 391 Command (m for help): w The partition table has been altered! Calling ioctl() to re-read partition table. Syncing disks. [root@hadb01 ~]# [root@hadb01 ~]# fdisk /dev/sdd Command (m for help): p Disk /dev/sdd: 3221 MB, 3221225472 bytes 255 heads, 63 sectors/track, 391 cylinders Units = cylinders of 16065 * 512 = 8225280 bytes Device Boot Start End Blocks Id System Command (m for help): n Command action e extended p primary partition (1-4) p Partition number (1-4): 1 First cylinder (1-391, default 1): Using default value 1 Last cylinder or +size or +sizeM or +sizeK (1-391, default 391): Using default value 391 Command (m for help): w The partition table has been altered! Calling ioctl() to re-read partition table. Syncing disks. [root@hadb01 ~]# [root@hadb01 ~]# fdisk /dev/sde Command (m for help): p Disk /dev/sde: 2147 MB, 2147483648 bytes 255 heads, 63 sectors/track, 261 cylinders Units = cylinders of 16065 * 512 = 8225280 bytes Device Boot Start End Blocks Id System Command (m for help): n Command action e extended p primary partition (1-4) p Partition number (1-4): 1 First cylinder (1-261, default 1): Using default value 1 Last cylinder or +size or +sizeM or +sizeK (1-261, default 261): Using default value 261 Command (m for help): w The partition table has been altered! Calling ioctl() to re-read partition table. Syncing disks. [root@hadb01 ~]# [root@hadb01 ~]# [root@hadb01 ~]# fdisk -l Disk /dev/sda: 21.4 GB, 21474836480 bytes 255 heads, 63 sectors/track, 2610 cylinders Units = cylinders of 16065 * 512 = 8225280 bytes Device Boot Start End Blocks Id System /dev/sda1 * 1 910 7309543+ 83 Linux /dev/sda2 911 1170 2088450 82 Linux swap /dev/sda3 1171 2610 11566800 83 Linux Disk /dev/sdb: 536 MB, 536870912 bytes 64 heads, 32 sectors/track, 512 cylinders Units = cylinders of 2048 * 512 = 1048576 bytes Device Boot Start End Blocks Id System /dev/sdb1 1 245 250864 83 Linux /dev/sdb2 246 490 250880 83 Linux Disk /dev/sdc: 3221 MB, 3221225472 bytes 255 heads, 63 sectors/track, 391 cylinders Units = cylinders of 16065 * 512 = 8225280 bytes Device Boot Start End Blocks Id System /dev/sdc1 1 391 3140676 83 Linux Disk /dev/sdd: 3221 MB, 3221225472 bytes 255 heads, 63 sectors/track, 391 cylinders Units = cylinders of 16065 * 512 = 8225280 bytes Device Boot Start End Blocks Id System /dev/sdd1 1 391 3140676 83 Linux Disk /dev/sde: 2147 MB, 2147483648 bytes 255 heads, 63 sectors/track, 261 cylinders Units = cylinders of 16065 * 512 = 8225280 bytes Device Boot Start End Blocks Id System /dev/sde1 1 261 2096451 83 Linux [root@hadb01 ~]# |
10.由于我们用到了asm,所以我们还需要装asm的rpm:
[root@hadb01 tmp]# rpm -Uvh oracleasmlib-2.0.2-1.i386.rpm

Preparing...                ########################################### [100%]

   1:oracleasmlib           ########################################### [100%]

[root@hadb01 tmp]# rpm -qa |grep asm

ibmasm-3.0-7

oracleasmlib-2.0.2-1

oracleasm-support-2.0.3-2

oracleasm-2.6.9-42.0.0.0.1.ELsmp-2.0.3-2

[root@hadb01 tmp]#
11.创建裸设备:
# vi /etc/sysconfig/rawdevices

/dev/raw/raw1 /dev/sdc1

/dev/raw/raw2 /dev/sdd1

/dev/raw/raw3 /dev/sde1

重启rawdevice服务使之生效:

# service rawdevices restart
更改裸设备宿主
[root@hadb01 tmp]# chown oracle:dba /dev/raw/raw*

[root@hadb01 tmp]# chmod 660 /dev/raw/raw*
由于裸设备重启会恢复到root宿主,所以要加到rc.local
|
1 2 3 4 5 6 7 8 9 10 11 12 13 14 15 16 17 |
# vi /etc/ rc.local #!/bin/sh # # This script will be executed *after* all the other init scripts. # You can put your own initialization stuff in here if you don't # want to do the full Sys V style init stuff. touch /var/lock/subsys/local # OCR chown root:oinstall /dev/raw/raw1 chmod 640 /dev/raw/raw1 # Voting Disk chown oracle:oinstall /dev/raw/raw2 chmod 640 /dev/raw/raw2 # ASM chown oracle:dba /dev/raw/raw[3-5] chmod 660 /dev/raw/raw[3-5] |
重启机器
12.节点2也同样的配置。只是在第9步骤进行不必再次进行分区,只需执行:
/sbin/partprobe /dev/sdb

/sbin/partprobe /dev/sdc

/sbin/partprobe /dev/sdd

/sbin/partprobe /dev/sde

/sbin/service rawdevices restart
即可。
13.配置用户信任关系:
hadb01-> mkdir ~/.ssh

hadb01-> chmod 700 ~/.ssh

hadb01> ssh-keygen -t rsa

Generating public/private rsa key pair.

Enter file in which to save the key (/export/home/oracle/.ssh/id_rsa):

Enter passphrase (empty for no passphrase):

Enter same passphrase again:

Your identification has been saved in /export/home/oracle/.ssh/id_rsa.

Your public key has been saved in /export/home/oracle/.ssh/id_rsa.pub.

The key fingerprint is:

87:54:4f:92:ba:ed:7b:51:5d:1d:59:5b:f9:44:da:b6 oracle@hadb01.mycorpdomain.com

habd01-> ssh-keygen -t dsa

Generating public/private dsa key pair.

Enter file in which to save the key (/export/home/oracle/.ssh/id_dsa):

Enter passphrase (empty for no passphrase):

Enter same passphrase again:

Your identification has been saved in /export/home/oracle/.ssh/id_dsa.

Your public key has been saved in /export/home/oracle/.ssh/id_dsa.pub.

The key fingerprint is:

31:76:96:e6:fc:b7:25:04:fd:70:42:04:1f:fc:9a:26 oracle@hadb01.mycorpdomain.com
hadb02-> mkdir ~/.ssh

hadb02-> chmod 700 ~/.ssh

hadb02-> ssh-keygen -t rsa

Generating public/private rsa key pair.

Enter file in which to save the key (/export/home/oracle/.ssh/id_rsa):

Enter passphrase (empty for no passphrase):

Enter same passphrase again:

Your identification has been saved in /export/home/oracle/.ssh/id_rsa.

Your public key has been saved in /export/home/oracle/.ssh/id_rsa.pub.

The key fingerprint is:

29:5a:35:ac:0a:03:2c:38:22:3c:95:5d:68:aa:56:66 oracle@rac2.mycorpdomain.com

hadb02-> ssh-keygen -t dsa

Generating public/private dsa key pair.

Enter file in which to save the key (/export/home/oracle/.ssh/id_dsa):

Enter passphrase (empty for no passphrase):

Enter same passphrase again:

Your identification has been saved in /export/home/oracle/.ssh/id_dsa.

Your public key has been saved in /export/home/oracle/.ssh/id_dsa.pub.

The key fingerprint is:

4c:b2:5a:8d:56:0f:dc:7b:bc:e0:cd:3b:8e:b9:5c:7c oracle@hadb02.mycorpdomain.com
hadb01-> cat ~/.ssh/id_rsa.pub >> ~/.ssh/authorized_keys

hadb01-> cat ~/.ssh/id_dsa.pub >> ~/.ssh/authorized_keys

hadb01-> ssh hadb02 cat ~/.ssh/id_rsa.pub >> ~/.ssh/authorized_keys

The authenticity of host 'hadb02 (192.168.2.132)' can't be established.

RSA key fingerprint is 63:d3:52:d4:4d:e2:cb:ac:8d:4a:66:9f:f1:ab:28:1f.

Are you sure you want to continue connecting (yes/no)? yes

Warning: Permanently added 'hadb02,192.168.2.132' (RSA) to the list of kno

oracle@hadb02's password:

hadb01-> ssh hadb02 cat ~/.ssh/id_dsa.pub >> ~/.ssh/authorized_keys

oracle@hadb02's password:

hadb01-> scp ~/.ssh/authorized_keys hadb02:~/.ssh/authorized_keys

oracle@hadb02's password:

authorized_keys                           100% 1716     1.7KB/s   00:00
在2个节点上都运行以下语句,如果提示需要密码,请重复执行:
ssh hadb01 date

ssh hadb02 date

ssh hadb01-priv date

ssh hadb02-priv date

ssh hadb01.mycorpdomain.com date

ssh hadb02.mycorpdomain.com date

ssh hadb01-priv.mycorpdomain.com date

ssh hadb02-priv.mycorpdomain.com date
14.配置asm:
# /etc/init.d/oracleasm configure

Configuring the Oracle ASM library driver.

This will configure the on-boot properties of the Oracle ASM library

driver.  The following questions will determine whether the driver is

loaded on boot and what permissions it will have.  The current values

will be shown in brackets ('[]').  Hitting  without typing an

answer will keep that current value.  Ctrl-C will abort.

Default user to own the driver interface []: oracle

Default group to own the driver interface []: dba

Start Oracle ASM library driver on boot (y/n) [n]: y

Fix permissions of Oracle ASM disks on boot (y/n) [y]: y

Writing Oracle ASM library driver configuration:           [  OK  ]

Loading module "oracleasm":                                [  OK  ]

Mounting ASMlib driver filesystem:                         [  OK  ]

Scanning system for ASM disks:                             [  OK  ]

Create ASM disks. Create the ASM disks on any one node as the root user.

# /etc/init.d/oracleasm createdisk VOL1 /dev/sdc1

Marking disk "/dev/sdc1" as an ASM disk:                   [  OK  ]

# /etc/init.d/oracleasm createdisk VOL2 /dev/sdd1

Marking disk "/dev/sdd1" as an ASM disk:                   [  OK  ]

# /etc/init.d/oracleasm createdisk VOL3 /dev/sde1

Marking disk "/dev/sde1" as an ASM disk:                   [  OK  ]

Verify that the ASM disks are visible from every node.

# /etc/init.d/oracleasm scandisks

Scanning system for ASM disks:                      [  OK  ]

# /etc/init.d/oracleasm listdisks

VOL1

VOL2

VOL3
另外,由于asm启动时候,会默认去查找/dev/raw/下所以文件,认为下面的所以是asm的盘,但是我们的/dev/raw/raw1和/dev/raw/raw2是ocr和votingdisk,因此需要手工的指定剩余的盘为asm diskstring:
hadb02-> cat init+ASM.ora

*.asm_diskstring='/dev/raw/raw3','/dev/raw/raw4','/dev/raw/raw5'

*.asm_diskgroups='DG1','RECOVERYDEST'

*.background_dump_dest='/u01/app/oracle/admin/+ASM/bdump'

*.core_dump_dest='/u01/app/oracle/admin/+ASM/cdump'

*.instance_type='asm'

*.large_pool_size=12M

*.remote_login_passwordfile='SHARED'

*.user_dump_dest='/u01/app/oracle/admin/+ASM/udump'
否则,在asm启动的时候,将会报错:
|
1 2 3 4 5 6 7 |
Loaded ASM Library - Generic Linux, version 2.0.2 (KABI_V2) library for asmlib interface Sun Jul 26 01:00:08 2009 ORA-15186: ASMLIB error function = [asm_open], error = [1], mesg = [Operation not permitted] Sun Jul 26 01:00:08 2009 ORA-15186: ASMLIB error function = [asm_open], error = [1], mesg = [Operation not permitted] Sun Jul 26 01:00:08 2009 ORA-15186: ASMLIB error function = [asm_open], error = [1], mesg = [Operation not permitted] |
二、 安装clusterware和数据库,用asm做存储:
安装clusterware在图形化界面进行,
在运行之前,我们先检查一边crs环境是否已经准备可以安装,执行clusterware安装包中的runcluvfy.sh:
|
1 2 3 4 5 6 7 8 9 10 11 12 13 14 15 16 17 18 19 20 21 22 23 24 25 26 27 28 29 30 31 32 33 34 35 36 37 38 39 40 41 42 43 44 45 46 47 48 49 50 51 52 53 54 55 56 57 58 59 60 61 62 63 64 65 66 67 68 69 70 71 72 73 74 75 76 77 78 79 80 81 82 83 84 85 86 87 88 89 90 91 92 93 94 95 96 97 98 99 100 101 102 103 104 105 106 107 108 109 110 111 112 113 114 115 116 117 118 119 120 121 122 123 124 125 126 127 128 129 130 131 132 133 134 135 136 137 138 139 140 141 142 143 144 145 146 147 148 149 150 151 152 153 154 155 156 157 158 159 160 161 162 163 164 165 166 167 168 169 170 171 172 173 174 175 176 177 178 179 180 181 182 183 184 185 186 187 188 189 190 191 192 193 194 195 196 197 198 199 200 201 202 203 204 205 206 207 208 209 210 211 212 213 214 215 216 217 218 219 220 221 222 223 224 225 226 227 228 229 230 |
hadb01-> ./runcluvfy.sh stage -pre crsinst -n hadb01,hadb02 -verbose Performing pre-checks for cluster services setup Checking node reachability... Check: Node reachability from node "hadb01" Destination Node Reachable? ------------------------------------ ------------------------ hadb01 yes hadb02 yes Result: Node reachability check passed from node "hadb01". Checking user equivalence... Check: User equivalence for user "oracle" Node Name Comment ------------------------------------ ------------------------ hadb02 passed hadb01 passed Result: User equivalence check passed for user "oracle". Checking administrative privileges... Check: Existence of user "oracle" Node Name User Exists Comment ------------ ------------------------ ------------------------ hadb02 yes passed hadb01 yes passed Result: User existence check passed for "oracle". Check: Existence of group "oinstall" Node Name Status Group ID ------------ ------------------------ ------------------------ hadb02 exists 500 hadb01 exists 500 Result: Group existence check passed for "oinstall". Check: Membership of user "oracle" in group "oinstall" [as Primary] Node Name User Exists Group Exists User in Group Primary Comment ---------------- ------------ ------------ ------------ ------------ ------------ hadb02 yes yes yes yes passed hadb01 yes yes yes yes passed Result: Membership check for user "oracle" in group "oinstall" [as Primary] passed. Administrative privileges check passed. Checking node connectivity... Interface information for node "hadb02" Interface Name IP Address Subnet ------------------------------ ------------------------------ ---------------- eth0 192.168.190.142 192.168.190.0 eth1 10.10.10.42 10.10.10.0 Interface information for node "hadb01" Interface Name IP Address Subnet ------------------------------ ------------------------------ ---------------- eth0 192.168.190.141 192.168.190.0 eth1 10.10.10.41 10.10.10.0 Check: Node connectivity of subnet "192.168.190.0" Source Destination Connected? ------------------------------ ------------------------------ ---------------- hadb02:eth0 hadb01:eth0 yes Result: Node connectivity check passed for subnet "192.168.190.0" with node(s) hadb02,hadb01. Check: Node connectivity of subnet "10.10.10.0" Source Destination Connected? ------------------------------ ------------------------------ ---------------- hadb02:eth1 hadb01:eth1 yes Result: Node connectivity check passed for subnet "10.10.10.0" with node(s) hadb02,hadb01. Suitable interfaces for the private interconnect on subnet "192.168.190.0": hadb02 eth0:192.168.190.142 hadb01 eth0:192.168.190.141 Suitable interfaces for the private interconnect on subnet "10.10.10.0": hadb02 eth1:10.10.10.42 hadb01 eth1:10.10.10.41 ERROR: Could not find a suitable set of interfaces for VIPs. Result: Node connectivity check failed. Checking system requirements for 'crs'... Check: Total memory Node Name Available Required Comment ------------ ------------------------ ------------------------ ---------- hadb02 688.9MB (705432KB) 512MB (524288KB) passed hadb01 688.9MB (705432KB) 512MB (524288KB) passed Result: Total memory check passed. Check: Free disk space in "/tmp" dir Node Name Available Required Comment ------------ ------------------------ ------------------------ ---------- hadb02 3.47GB (3640768KB) 400MB (409600KB) passed hadb01 3.31GB (3468744KB) 400MB (409600KB) passed Result: Free disk space check passed. Check: Swap space Node Name Available Required Comment ------------ ------------------------ ------------------------ ---------- hadb02 1.99GB (2088440KB) 1GB (1048576KB) passed hadb01 1.99GB (2088440KB) 1GB (1048576KB) passed Result: Swap space check passed. Check: System architecture Node Name Available Required Comment ------------ ------------------------ ------------------------ ---------- hadb02 i686 i686 passed hadb01 i686 i686 passed Result: System architecture check passed. Check: Kernel version Node Name Available Required Comment ------------ ------------------------ ------------------------ ---------- hadb02 2.6.9-42.0.0.0.1.ELsmp 2.4.21-15EL passed hadb01 2.6.9-42.0.0.0.1.ELsmp 2.4.21-15EL passed Result: Kernel version check passed. Check: Package existence for "make-3.79" Node Name Status Comment ------------------------------ ------------------------------ ---------------- hadb02 make-3.80-6.EL4 passed hadb01 make-3.80-6.EL4 passed Result: Package existence check passed for "make-3.79". Check: Package existence for "binutils-2.14" Node Name Status Comment ------------------------------ ------------------------------ ---------------- hadb02 binutils-2.15.92.0.2-21 passed hadb01 binutils-2.15.92.0.2-21 passed Result: Package existence check passed for "binutils-2.14". Check: Package existence for "gcc-3.2" Node Name Status Comment ------------------------------ ------------------------------ ---------------- hadb02 gcc-3.4.6-3.1 passed hadb01 gcc-3.4.6-3.1 passed Result: Package existence check passed for "gcc-3.2". Check: Package existence for "glibc-2.3.2-95.27" Node Name Status Comment ------------------------------ ------------------------------ ---------------- hadb02 glibc-2.3.4-2.25 passed hadb01 glibc-2.3.4-2.25 passed Result: Package existence check passed for "glibc-2.3.2-95.27". Check: Package existence for "compat-db-4.0.14-5" Node Name Status Comment ------------------------------ ------------------------------ ---------------- hadb02 compat-db-4.1.25-9 passed hadb01 compat-db-4.1.25-9 passed Result: Package existence check passed for "compat-db-4.0.14-5". Check: Package existence for "compat-gcc-7.3-2.96.128" Node Name Status Comment ------------------------------ ------------------------------ ---------------- hadb02 missing failed hadb01 missing failed Result: Package existence check failed for "compat-gcc-7.3-2.96.128". Check: Package existence for "compat-gcc-c++-7.3-2.96.128" Node Name Status Comment ------------------------------ ------------------------------ ---------------- hadb02 missing failed hadb01 missing failed Result: Package existence check failed for "compat-gcc-c++-7.3-2.96.128". Check: Package existence for "compat-libstdc++-7.3-2.96.128" Node Name Status Comment ------------------------------ ------------------------------ ---------------- hadb02 missing failed hadb01 missing failed Result: Package existence check failed for "compat-libstdc++-7.3-2.96.128". Check: Package existence for "compat-libstdc++-devel-7.3-2.96.128" Node Name Status Comment ------------------------------ ------------------------------ ---------------- hadb02 missing failed hadb01 missing failed Result: Package existence check failed for "compat-libstdc++-devel-7.3-2.96.128". Check: Package existence for "openmotif-2.2.3" Node Name Status Comment ------------------------------ ------------------------------ ---------------- hadb02 openmotif-2.2.3-10.RHEL4.5 passed hadb01 openmotif-2.2.3-10.RHEL4.5 passed Result: Package existence check passed for "openmotif-2.2.3". Check: Package existence for "setarch-1.3-1" Node Name Status Comment ------------------------------ ------------------------------ ---------------- hadb02 setarch-1.6-1 passed hadb01 setarch-1.6-1 passed Result: Package existence check passed for "setarch-1.3-1". Check: Group existence for "dba" Node Name Status Comment ------------ ------------------------ ------------------------ hadb02 exists passed hadb01 exists passed Result: Group existence check passed for "dba". Check: Group existence for "oinstall" Node Name Status Comment ------------ ------------------------ ------------------------ hadb02 exists passed hadb01 exists passed Result: Group existence check passed for "oinstall". Check: User existence for "nobody" Node Name Status Comment ------------ ------------------------ ------------------------ hadb02 exists passed hadb01 exists passed Result: User existence check passed for "nobody". System requirement failed for 'crs' Pre-check for cluster services setup was unsuccessful on all the nodes. hadb01-> |
上述的vip问题,我们将再安装的过程中解决,可以见下面的安装步骤;关于Package failed的问题,我们可以忽略。
好,我们开始图形化安装,我们看图说话:
在clusterware目录,运行runInstaller开始安装cluster:

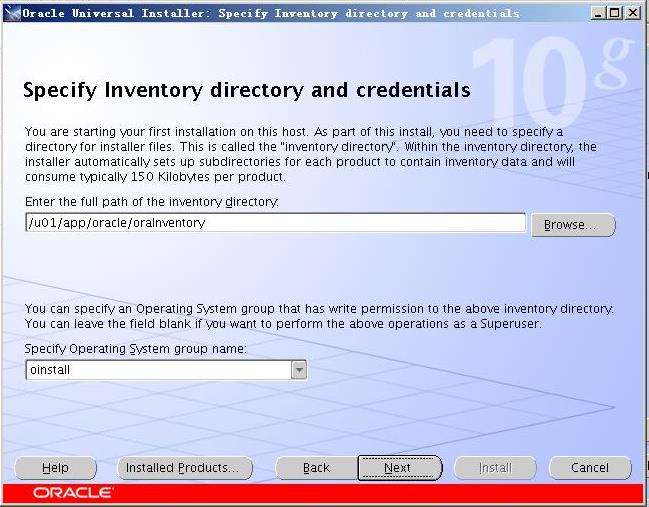
选择inventory的目录:
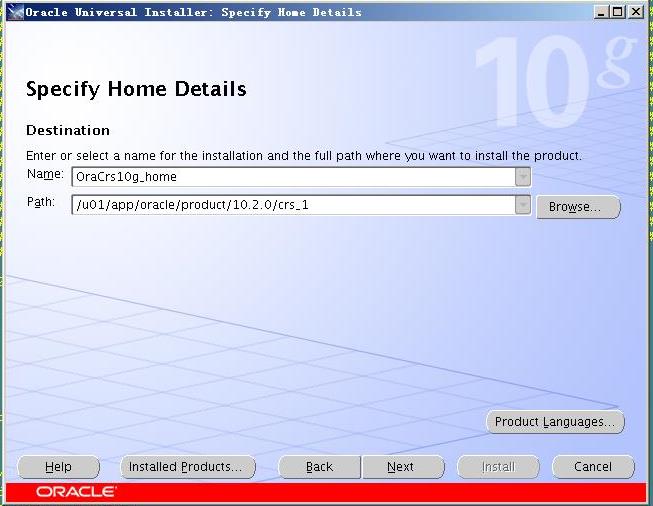
选择crs home,注意这里的crs home为crs_1,不要选择成db_1:
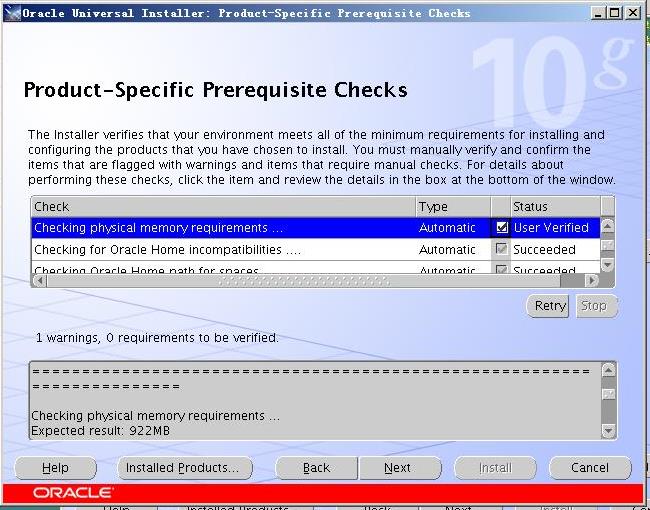
系统检查,可以忽略内存的告警提示:
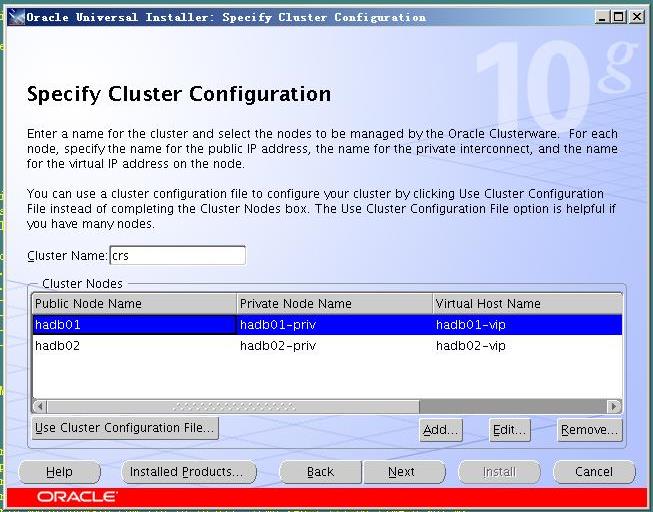
cluster配置:
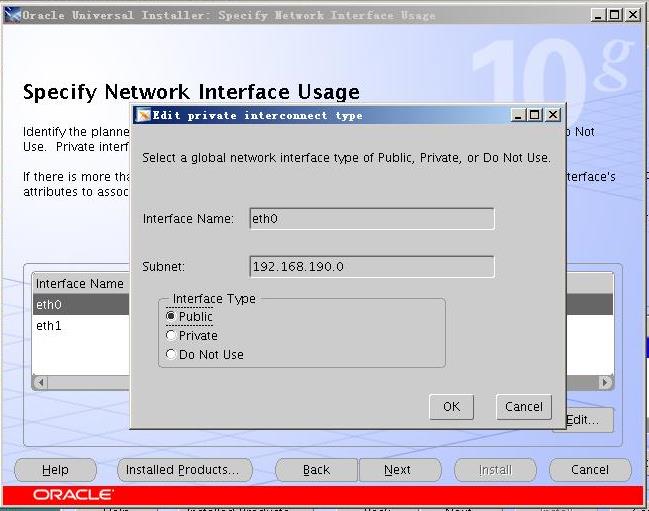
网络配置:
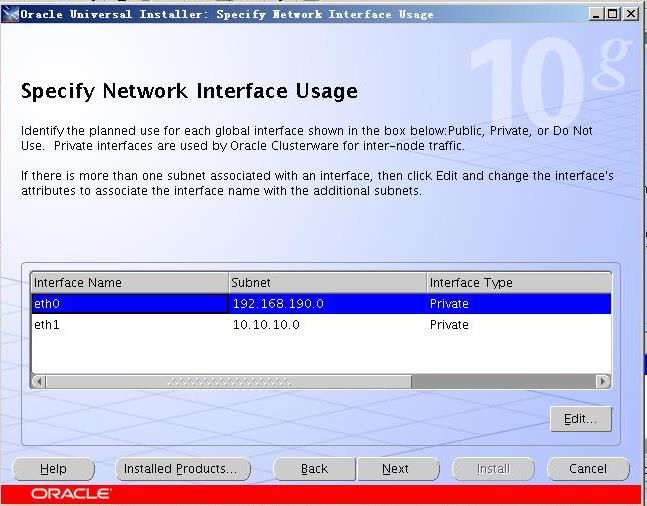
网络配置中要把eth0改成public:
选择ocr文件的路径:

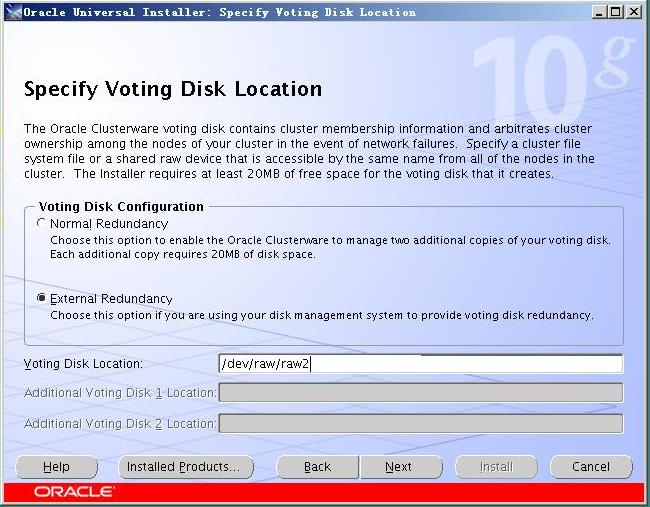
选择votingdisk路径:
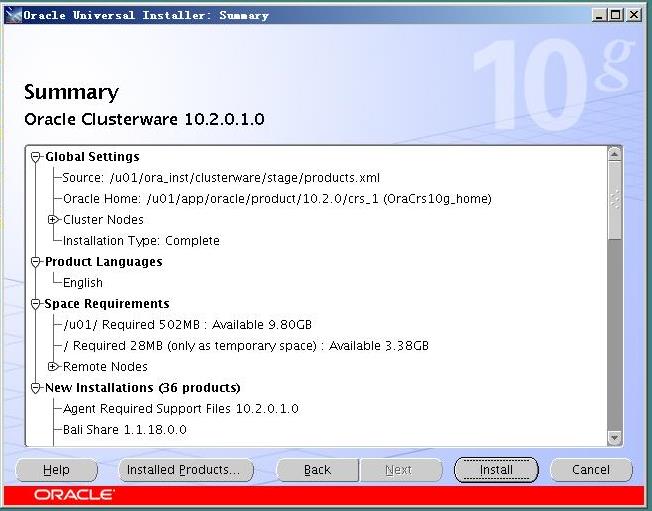
提示summary:
在各个节点上执行以下2个脚本,注意!执行之后不要基于点ok,我们还有别的工作要做,就是上面提到的在-pre检查时候的vip的问题:
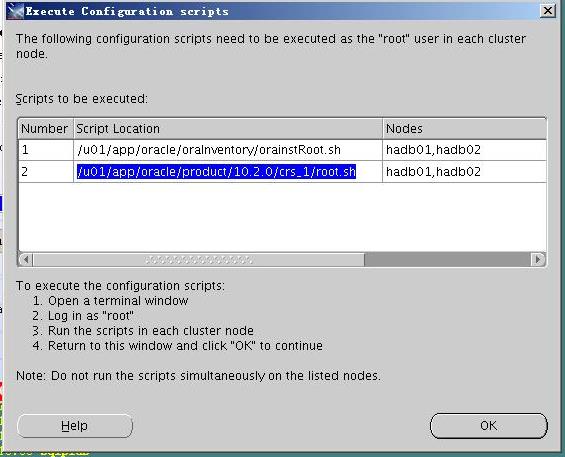
我们另外在hadb02上开一个窗口,以root权限运行:
# /u01/app/oracle/product/10.2.0/crs_1/bin/vipca
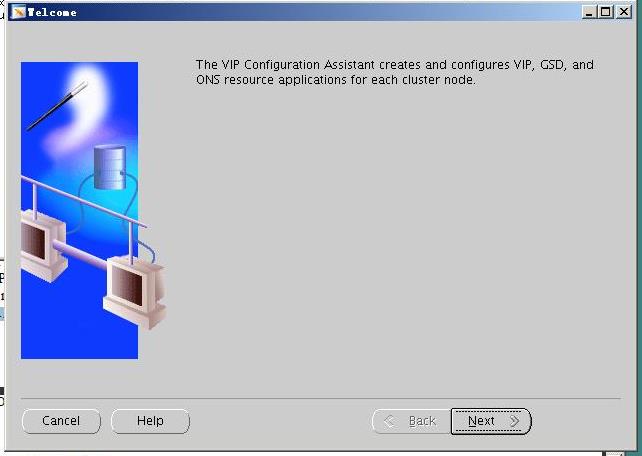
这里全部选中:

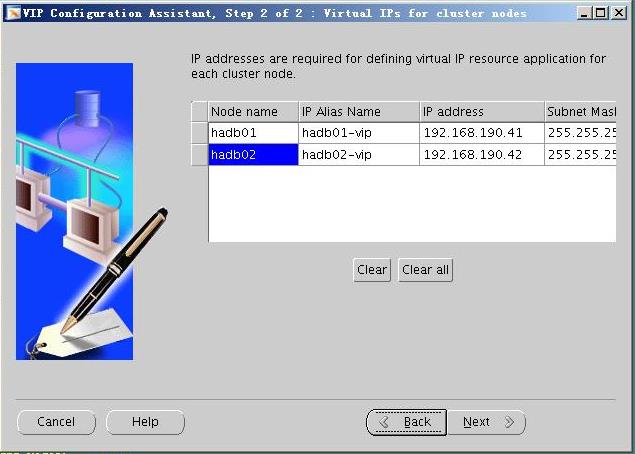
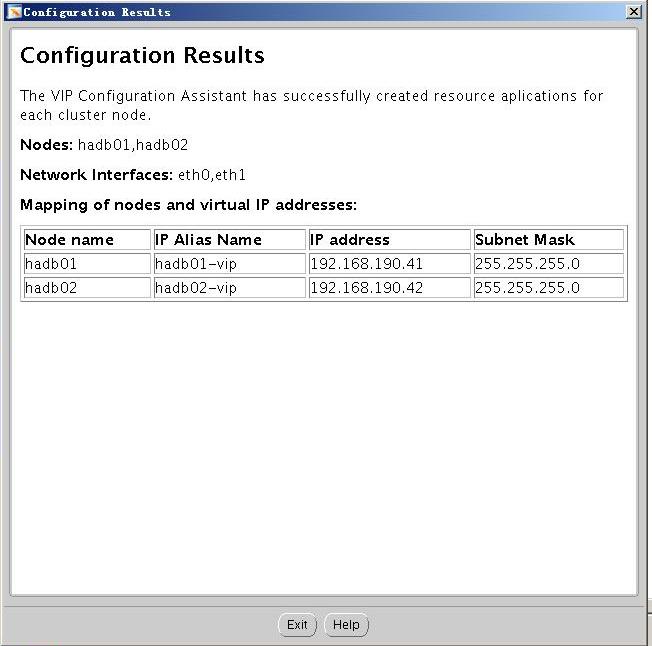
写上各个节点的vip别名和地址:
summary检查配置情况:
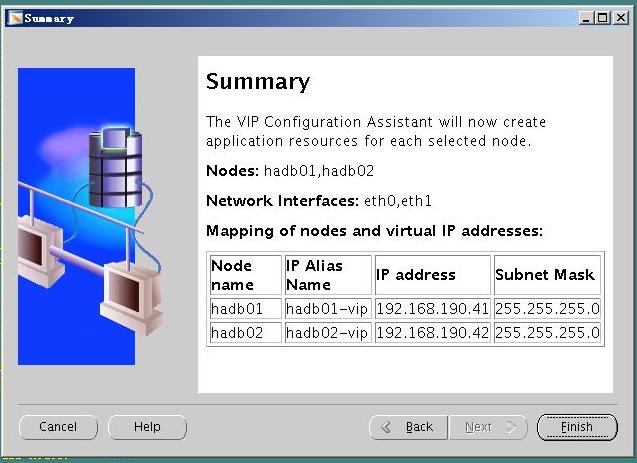
开始progress:
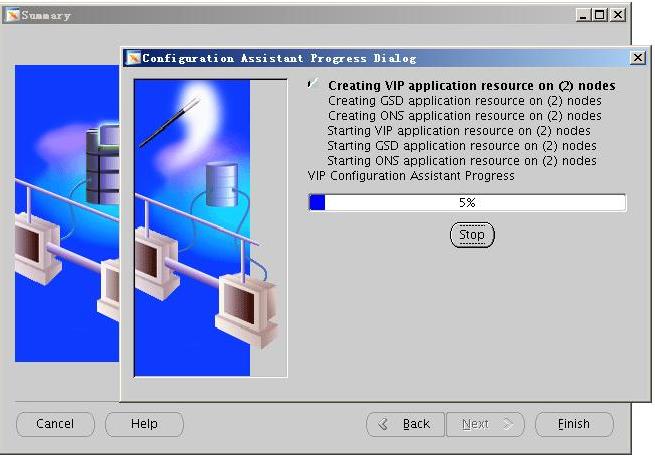
完成vip配置:
此时在回去刚刚的界面,点击ok,就进入到了下一步的配置:
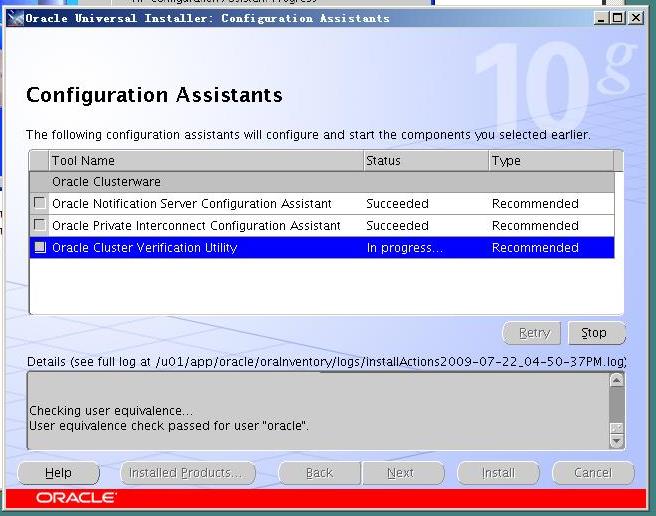
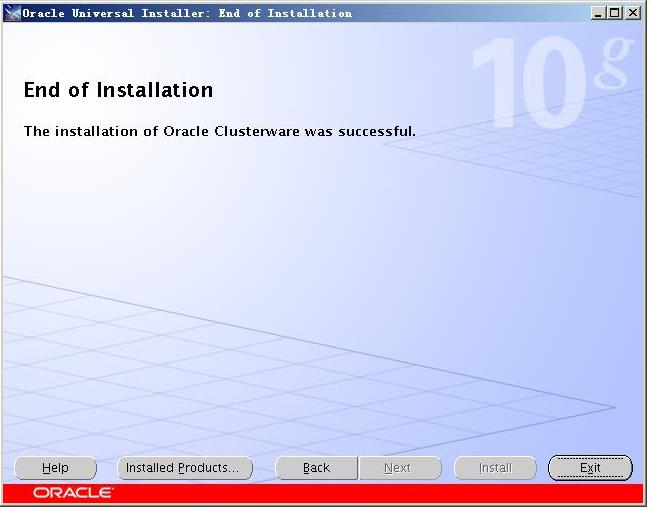
clusterware安装完成:
此时,cluster已经安装完毕,要看是否创建成功,我们可以运行以下的脚本来进行验证:
|
1 2 3 4 5 6 7 8 9 10 11 12 13 14 15 16 17 18 19 20 21 22 23 24 25 26 27 28 29 30 31 32 33 34 35 36 37 38 39 40 41 42 43 44 45 46 47 48 49 50 51 52 53 54 55 56 57 58 59 60 61 62 63 64 65 66 67 68 69 70 |
hadb01->/u01/app/oracle/product/10.2.0/crs_1/bin/cluvfy stage -post crsinst -n hadb01,hadb02 Performing post-checks for cluster services setup Checking node reachability... Node reachability check passed from node "hadb01". Checking user equivalence... User equivalence check passed for user "oracle". Checking Cluster manager integrity... Checking CSS daemon... Daemon status check passed for "CSS daemon". Cluster manager integrity check passed. Checking cluster integrity... Cluster integrity check passed Checking OCR integrity... Checking the absence of a non-clustered configuration... All nodes free of non-clustered, local-only configurations. Uniqueness check for OCR device passed. Checking the version of OCR... OCR of correct Version "2" exists. Checking data integrity of OCR... Data integrity check for OCR passed. OCR integrity check passed. Checking CRS integrity... Checking daemon liveness... Liveness check passed for "CRS daemon". Checking daemon liveness... Liveness check passed for "CSS daemon". Checking daemon liveness... Liveness check passed for "EVM daemon". Checking CRS health... CRS health check passed. CRS integrity check passed. Checking node application existence... Checking existence of VIP node application (required) Check passed. Checking existence of ONS node application (optional) Check passed. Checking existence of GSD node application (optional) Check passed. Post-check for cluster services setup was successful. hadb01-> |
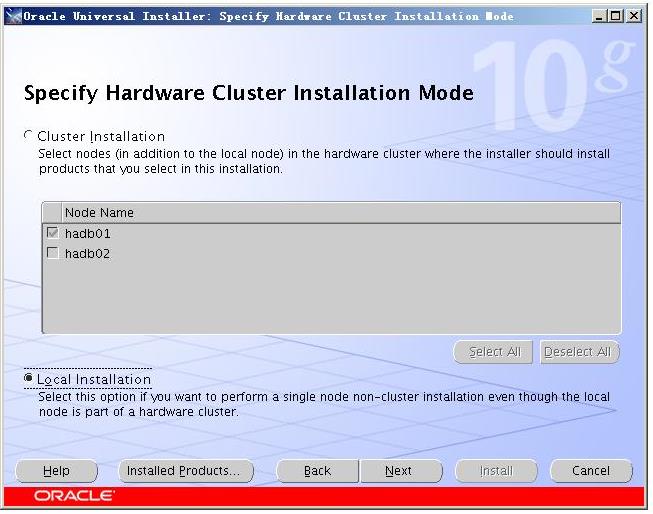
如果没有问题,好,我们开始来建数据库,同样也是图形化的安装方式,注意选择local installation:
点击db的runInstaller:

选择需要的数据库版本:

选择oracle home:

注意这里选择local installation:
忽略内存的提示告警:

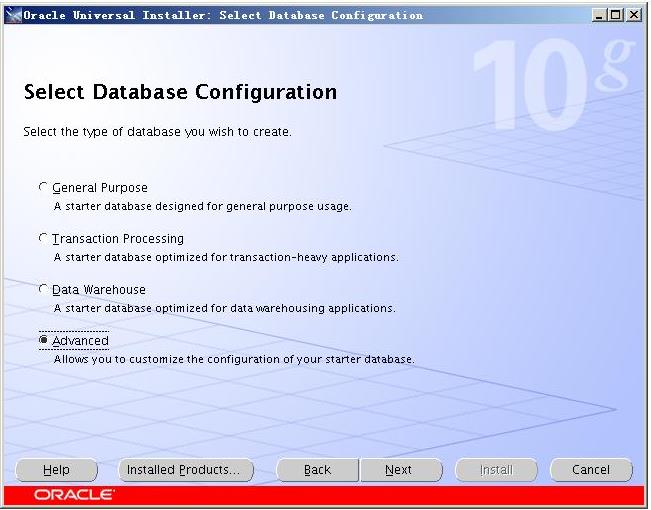
选择advance:
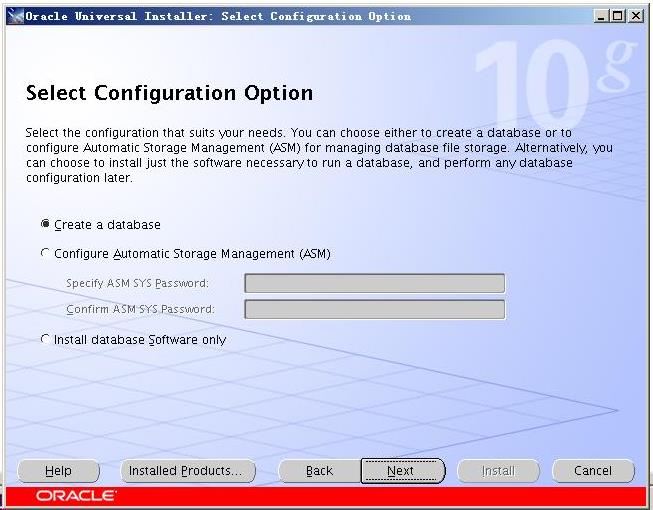
选择create database:
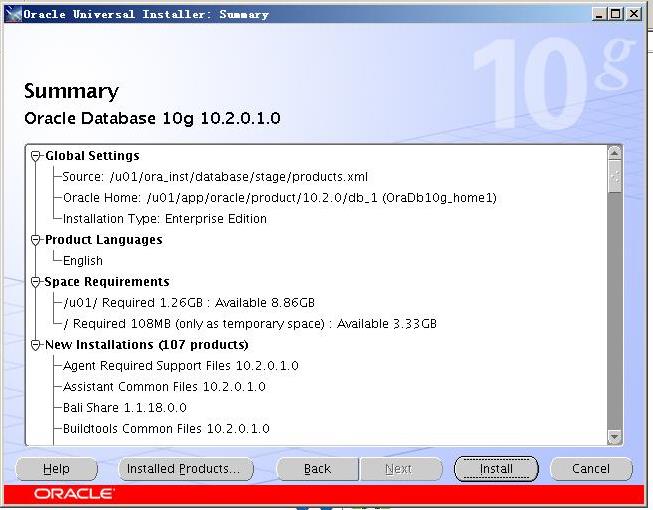
检查summary:
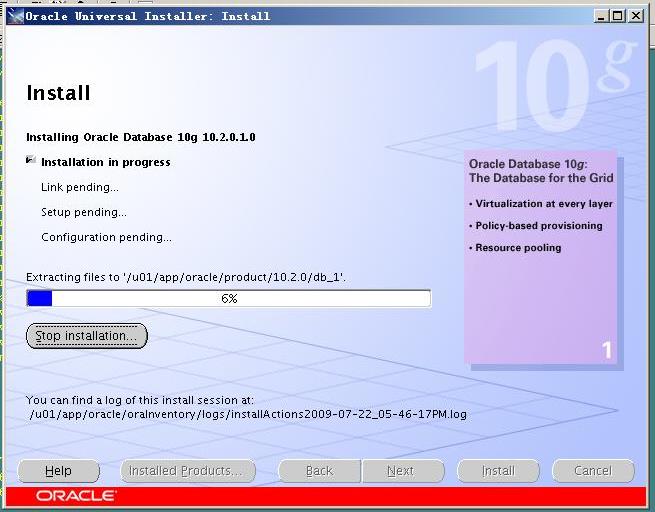
开始安装数据库软件:
选择customer类型的database:
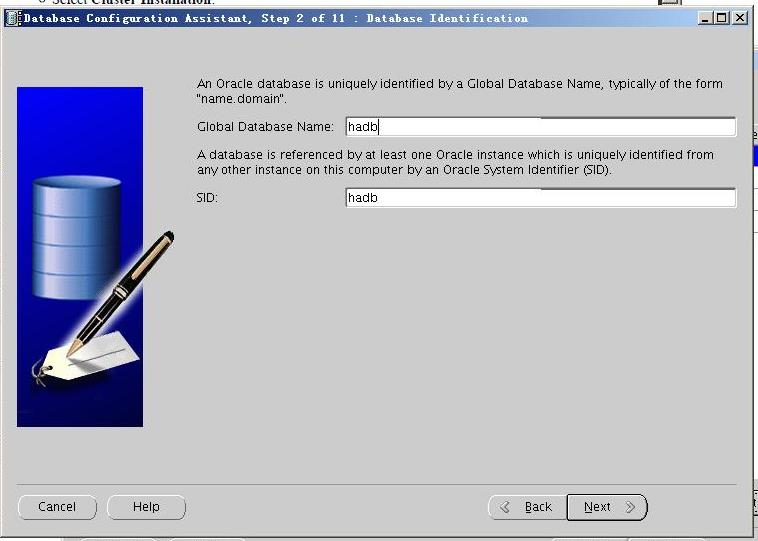
写上你的db name和sid:
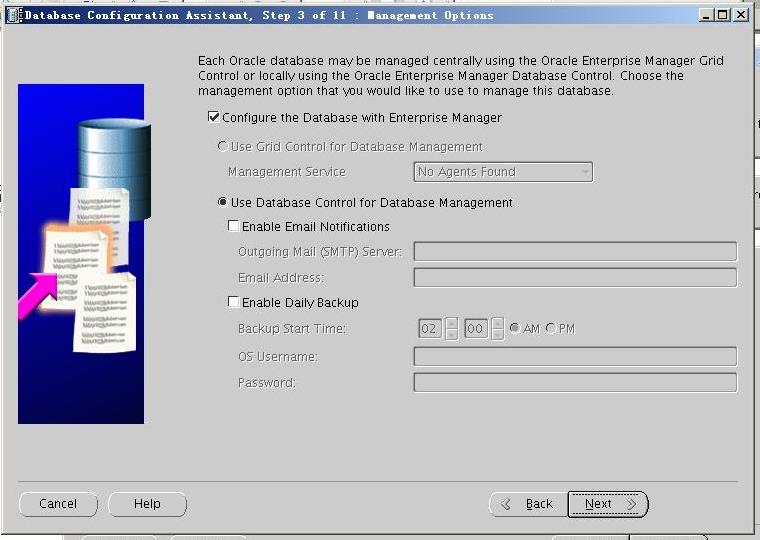
用EM管理数据库
设置系统账户的密码:
设置asm系统账户的密码:
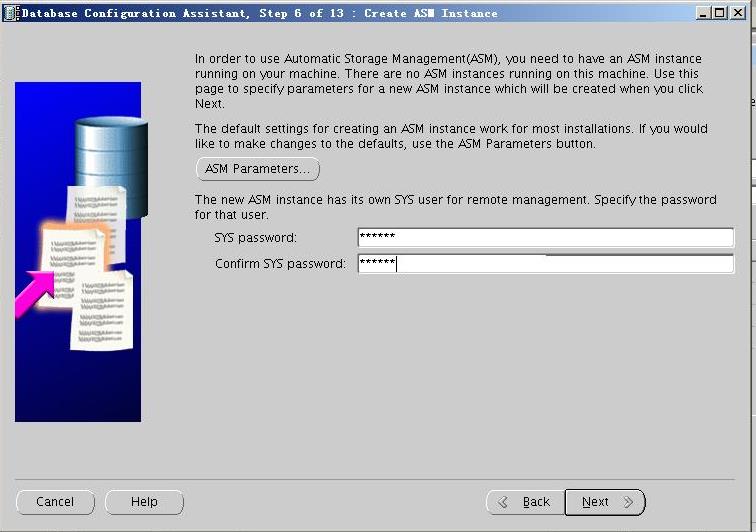
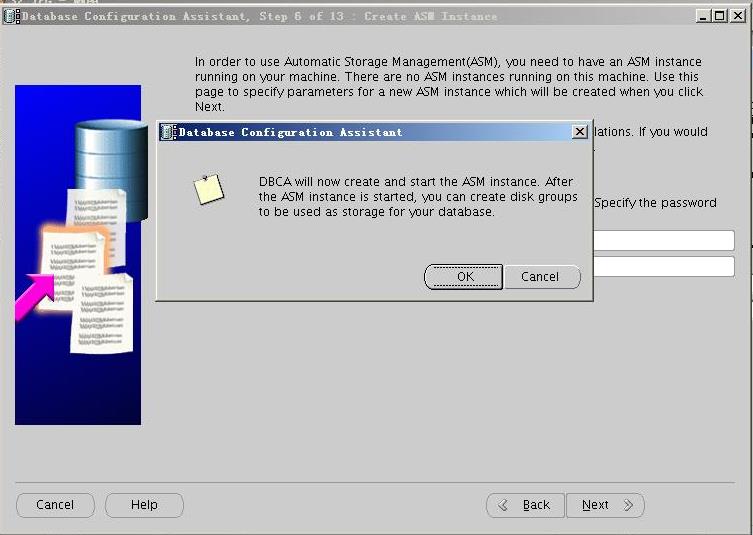
建立asm实例,点ok:
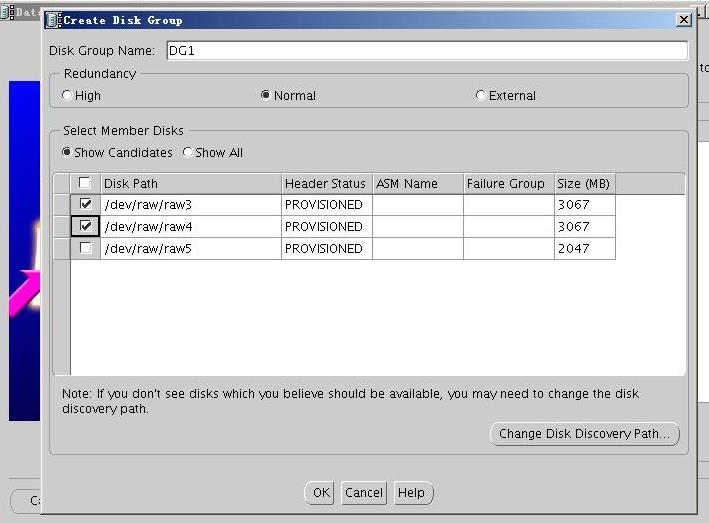
设置asm的diskgroup,先设一个DG1,以raw3和raw4做normal的冗余:
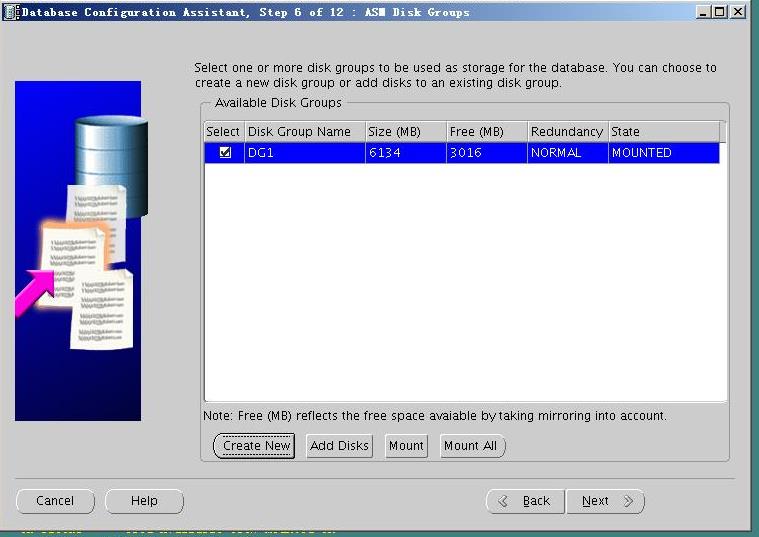
DG1建立完成,继续点create new:
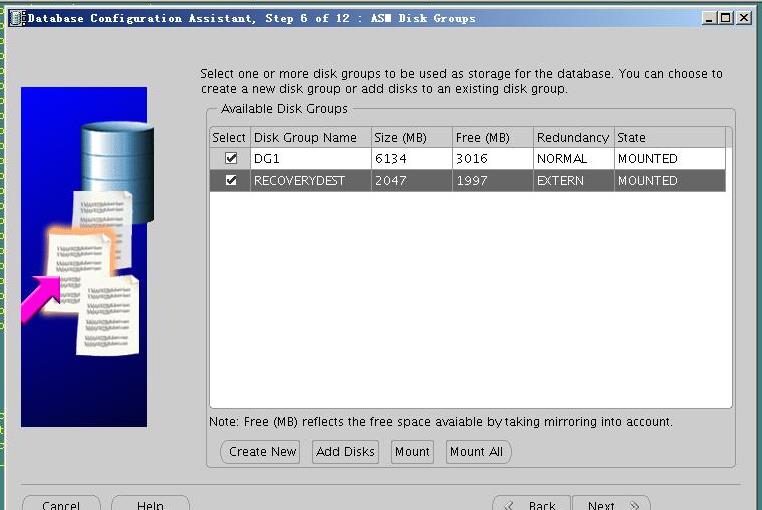
建recoverydest,不需要冗余,点external:

diskgroup都创建完成:
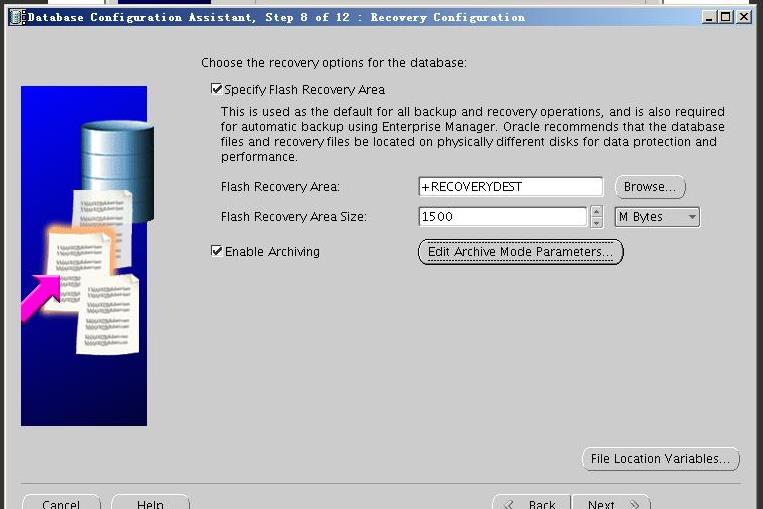
指定flash recovery recovery area路径,我们选择asm上的recoverydest:
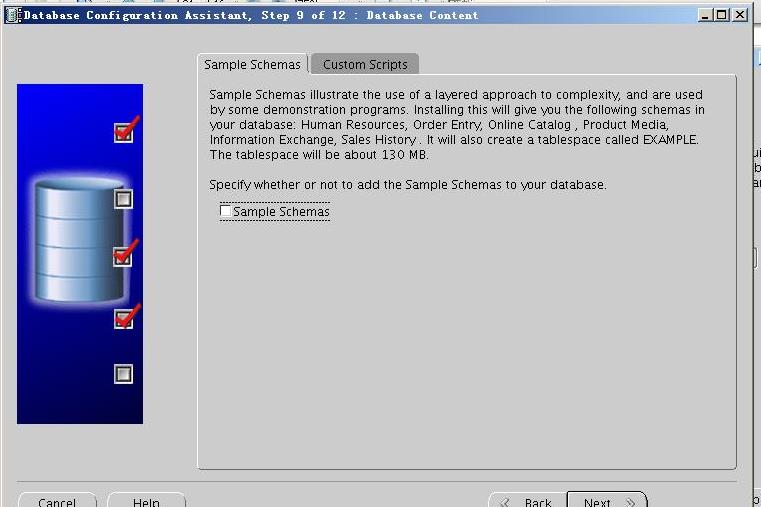
取消sample schema的安装:
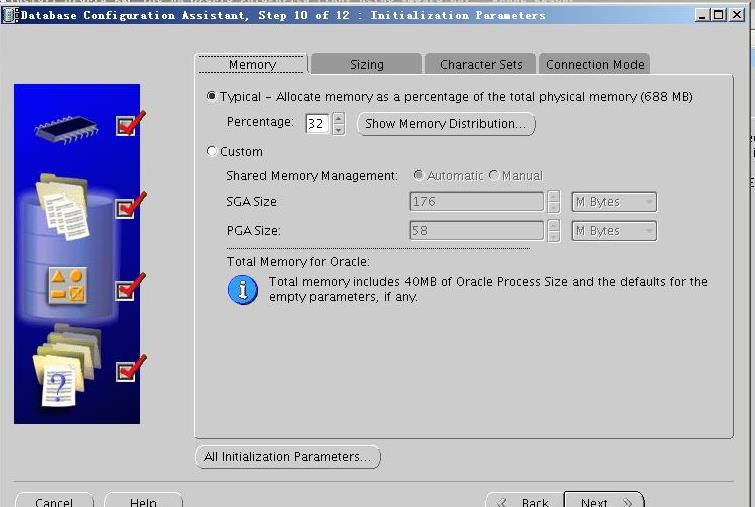
数据库的相关参数设置:
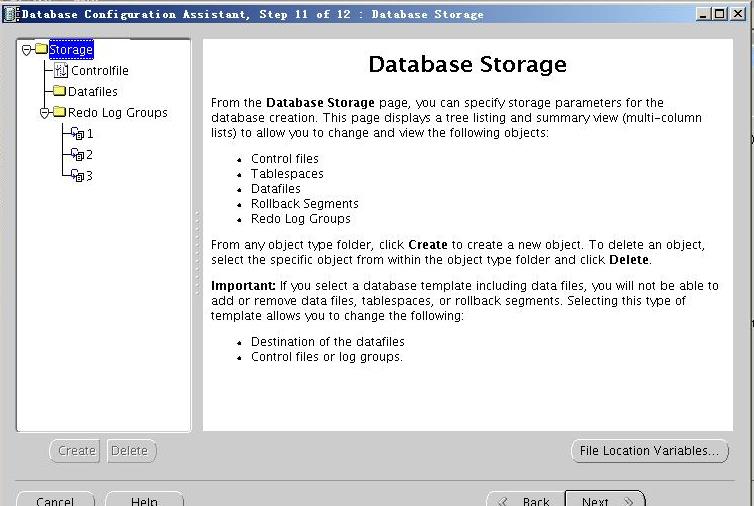
database各个文件的配置:
最后确认创建db:
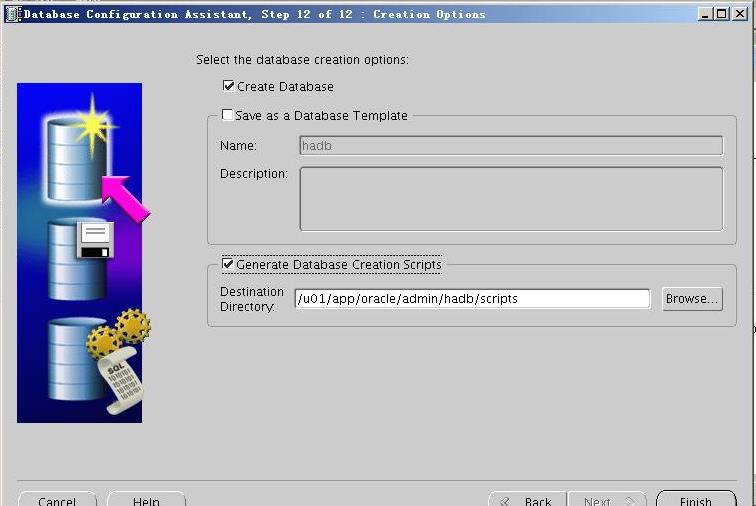
db开始建立:

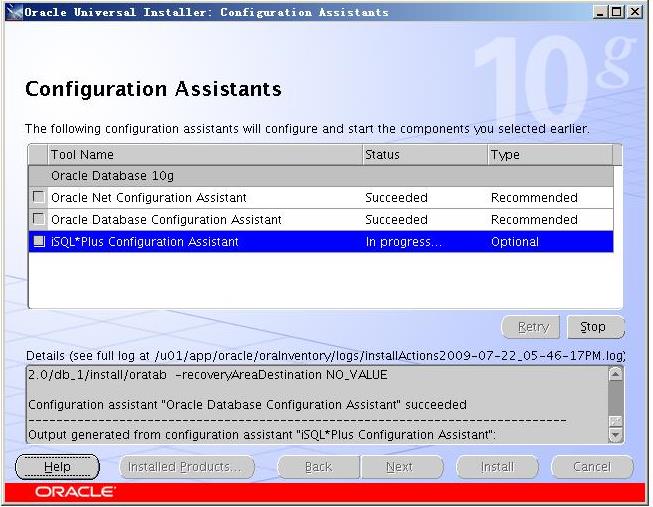
db自动配置:
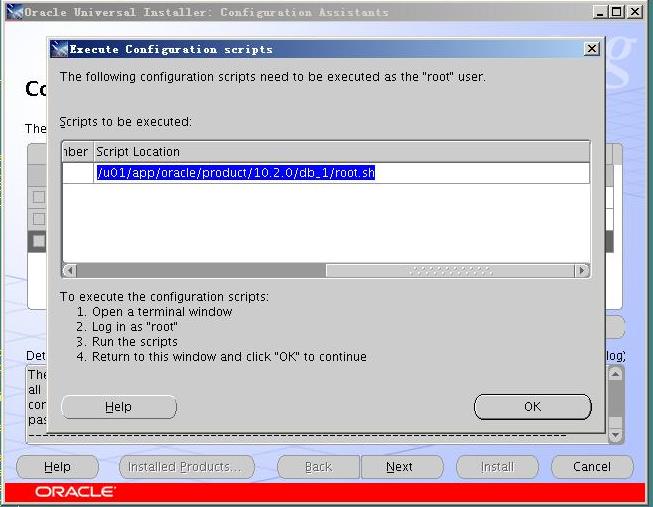
执行db的root.sh:
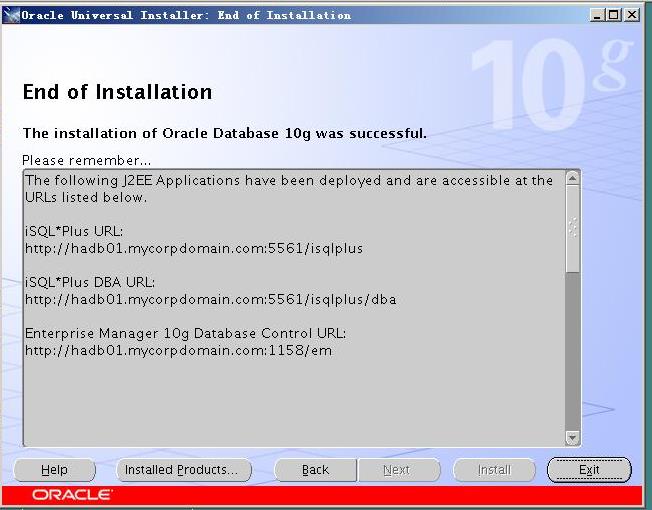
db配置完成:
我们在hadb02上也用runInstaller安装,这次仅安装数据库软件,不用建数据库即可。
至此,数据库已经安装完毕。
三、 cluster的配置:
1.在$ORA_CRS_HOME/crs/pubic下建立5个脚本:
act_asm.pl

act_db.pl

act_listener.pl

act_resgroup.pl

action_scr.scr
(这5个脚本见文档末尾附件处。)
注意以上脚本要有执行权限:
# cd /u01/app/oracle/product/10.2.0/crs_1/crs/public

# chmod +x *

# su – oracle

hadb01-> cd /u01/app/oracle/product/10.2.0/crs_1/crs/public

hadb01-> scp * hadb02: /u01/app/oracle/product/10.2.0/crs_1/crs/public
2.将hosts文件中的原来的vip去掉,改成:
192.168.190.143 hadb-vip
3.改侦听名称:
LISTENER_RG1 =

(DESCRIPTION_LIST =

(DESCRIPTION =

(ADDRESS = (PROTOCOL = TCP)(HOST = hadb-vip)(PORT = 1521)(IP = FIRST))

)

)
4.将各个资源注册到crs:
在注册之前,我们可以将之前以rac方式安装的crs的一些资源进行unregister掉:
crs_unregister ora.hadb01.gsd

crs_unregister ora.hadb02.gsd

crs_unregister ora.hadb01.ons

crs_unregister ora.hadb02.ons

crs_unregister ora.hadb01.vip

crs_unregister ora.hadb02.vip
注意unregister vip的时候,要用root权限
4.1 注册rg1:
hadb01->crs_profile -create rg1 -t application -a $CRS_HOME/crs/public/act_resgroup.pl -o ci=600

hadb01->crs_register rg1
4.2 注册vip:
hadb01->crs_profile -create rg1.vip -t application -r rg1 -a $CRS_HOME/bin/usrvip \

> -o oi=eth0,ov=192.168.190.143,on=255.255.255.0
注意oi是用作应用的网卡,可以通过ifconfig看,他的地址应该是192.168.190.141;ov指vip的地址,on指子网掩码。
hadb01-> crs_register rg1.vip
再退回到root权限,修改vip资源的权限:
# ./crs_setperm rg1.vip -o root

# ./crs_setperm rg1.vip -u user:oracle:r-x
4.3 测试vip资源是否能正常启动:
|
1 2 3 4 5 6 7 8 9 10 |
hadb01-> crs_start -c hadb02 rg1.vip Attempting to start `rg1` on member `hadb02` Start of `rg1` on member `hadb02` succeeded. Attempting to start `rg1.vip` on member `hadb02` Start of `rg1.vip` on member `hadb02` succeeded. hadb01-> crs_stat -t -v Name Type R/RA F/FT Target State Host ---------------------------------------------------------------------- rg1 application 0/1 0/0 ONLINE ONLINE hadb02 rg1.vip application 0/1 0/0 ONLINE ONLINE hadb02 |
hadb01-> ping hadb-vip

PING hadb-vip.mycorpdomain.com (192.168.190.143) 56(84) bytes of data.

64 bytes from hadb-vip.mycorpdomain.com (192.168.190.143): icmp_seq=0 ttl=64 time=4.93 ms

64 bytes from hadb-vip.mycorpdomain.com (192.168.190.143): icmp_seq=1 ttl=64 time=15.2 ms

64 bytes from hadb-vip.mycorpdomain.com (192.168.190.143): icmp_seq=2 ttl=64 time=1.38 ms

64 bytes from hadb-vip.mycorpdomain.com (192.168.190.143): icmp_seq=3 ttl=64 time=5.14 ms

64 bytes from hadb-vip.mycorpdomain.com (192.168.190.143): icmp_seq=4 ttl=64 time=0.522 ms
|
1 2 3 4 5 6 7 8 9 10 11 12 13 14 15 |
hadb01-> crs_relocate -f rg1 Attempting to stop `rg1.vip` on member `hadb02` Stop of `rg1.vip` on member `hadb02` succeeded. Attempting to stop `rg1` on member `hadb02` Stop of `rg1` on member `hadb02` succeeded. Attempting to start `rg1` on member `hadb01` Start of `rg1` on member `hadb01` succeeded. Attempting to start `rg1.vip` on member `hadb01` Start of `rg1.vip` on member `hadb01` succeeded. hadb01-> crs_stat -t Name Type Target State Host ------------------------------------------------------------ rg1 application ONLINE ONLINE hadb01 rg1.vip application ONLINE ONLINE hadb01 hadb01-> |
4.4注册侦听:
|
1 2 3 4 5 6 7 8 9 10 11 12 13 14 15 16 17 18 19 20 21 22 23 24 |
hadb01-> crs_profile -create rg1.listener \ > -t application \ > -r rg1.vip \ > -a $ORA_CRS_HOME/crs/public/act_listener.pl \ > -o ci=20,ra=5,osrv=LISTENER_RG1,ol=$ORACLE_HOME hadb01-> crs_register rg1.listener hadb01-> crs_stat -t -v Name Type R/RA F/FT Target State Host ---------------------------------------------------------------------- rg1 application 0/1 0/0 ONLINE ONLINE hadb01 rg1.listener application 0/5 0/0 OFFLINE OFFLINE rg1.vip application 0/1 0/0 ONLINE ONLINE hadb01 hadb01-> crs_start rg1.listener Attempting to start `rg1.listener` on member `hadb01` Start of `rg1.listener` on member `hadb01` succeeded. hadb01-> hadb01-> hadb01-> hadb01-> crs_stat -t Name Type Target State Host ------------------------------------------------------------ rg1 application ONLINE ONLINE hadb01 rg1.listener application ONLINE ONLINE hadb01 rg1.vip application ONLINE ONLINE hadb01 |
4.5 注册asm:
hadb01-> crs_profile -create rg1.asm -t application \

> -r rg1 -a $ORA_CRS_HOME/crs/public/act_asm.pl \

> -o ci=20,ra=5,osrv=+ASM,ol=$ORACLE_HOME,oflags=1,rt=600

hadb01->

hadb01->

hadb01-> crs_register rg1.asm

hadb01->

hadb01->

hadb01->

hadb01-> cr_stat -t

ksh: cr_stat: not found

hadb01-> crs_stat -t

Name           Type           Target    State     Host

------------------------------------------------------------

rg1            application    ONLINE    ONLINE    hadb01

rg1.asm        application    OFFLINE   OFFLINE

rg1.listener   application    ONLINE    ONLINE    hadb01

rg1.vip        application    ONLINE    ONLINE    hadb01

hadb01->

hadb01-> crs_start rg1.asm

Attempting to start rg1 on member hadb01

Start of rg1 on member hadb01 succeeded.

Attempting to start rg1.asm on member hadb01

Start of rg1.asm on member hadb01 succeeded.

hadb01-> crs_stat -t

Name           Type           Target    State     Host

------------------------------------------------------------

rg1            application    ONLINE    ONLINE    hadb01

rg1.asm        application    ONLINE    ONLINE    hadb01

rg1.listener   application    ONLINE    ONLINE    hadb01

rg1.vip        application    ONLINE    ONLINE    hadb01
4.6 注册db:
hadb01-> crs_profile -create rg1.hadb -t application \

> -r rg1.asm -a $ORA_CRS_HOME/crs/public/act_db.pl \

> -o ci=20,ra=5,osrv=hadb,ol=$ORACLE_HOME,oflags=1,rt=600

hadb01-> crs_register rg1.hadb

hadb01-> crs_start rg1.hadb

Attempting to start rg1.hadb on member hadb01

Start of rg1.hadb on member hadb01 succeeded.

hadb01-> crs_stat -t -v

Name           Type           R/RA   F/FT   Target    State     Host

----------------------------------------------------------------------

rg1            application    0/1    0/0    ONLINE    ONLINE    hadb01

rg1.asm        application    0/5    0/0    ONLINE    ONLINE    hadb01

rg1.hadb       application    0/5    0/0    ONLINE    ONLINE    hadb01

rg1.listener   application    0/5    0/0    ONLINE    ONLINE    hadb01

rg1.vip        application    0/1    0/0    ONLINE    ONLINE    hadb01
至此我们已经完成了所以的安装工作。
四、Failover测试
现在,我们进行failover的测试。为了简单起见,这边直接把测试项目和测试结果列举了出来:
|
1 2 3 4 5 |
1. 资源原来在hadb01上,杀掉listener进程,发现crs会尝试重启,重启后再次杀掉listener进程,crs还是重启,根据设置了restart_attempts为5,反复上面的步骤5次后,资源切换到hadb02. 2. 资源原来在hadb02,将hadb02进行shutdown –hy 0,宕机后,资源切换到hadb01. 3. 资源原来在hadb01上,deactive hadb01的interconnect网卡或者拔掉hadb01上的interconnect的网线,则cluster自动重启hadb02. 4. cluster自动重启hadb02后,恢复interconnect网卡或者重新连上interconnect网线,此时如果kill hadb01上的资源的话,不会发生切换,只是被kill的资源处于offline状态。因为此时hadb02上的crsd没启动。 5. 再次重启hadb02后,hadb02上的crsd启动,重新加入到cluster资源组。恢复正常,可以继续做failover了。 |
附件:
进行crs切换的5个脚本:
act_asm.pl
## act_asm.pl start here.
#!/usr/bin/perl
#
# $Header: act_db.pl 05-apr-2007.14:21:24 rvenkate Exp $
#
# act_asm.pl
#
# Copyright (c) 2007, Oracle. All rights reserved.
#
# NAME
# act_db.pl -
#
# DESCRIPTION
# This perl script is the action script for start / stop / check
# the Oracle Instance in a cold failover configuration.
#
# Place this file in
#
# NOTES
# Edit the perl installation directory as appropriate.
#
# MODIFIED (MM/DD/YY)
# pnewlan 05/25/07 . use grep -w
# rvenkate 04/05/07 - checkin into demo dir
# pnewlan 01/17/07 - Use Environment variables rather than hard code
# - HOME & SID
# pnewlan 11/23/06 - oracle OS user invoker
# rknapp 05/22/06 - Creation
#
$ORACLE_HOME = "$ENV{_USR_ORA_LANG}";
$ORACLE_SID = "$ENV{_USR_ORA_SRV}";
if ($#ARGV != 0 ) {
print "usage: start stop check required \n";
exit;
}
$command = $ARGV[0];
# Database start stop check
# Start database
if ($command eq "start" ) {
system ("
export ORACLE_SID=$ORACLE_SID
export ORACLE_HOME=$ORACLE_HOME
export LD_LIBRARY_PATH=$ORACLE_HOME/lib:$LD_LIBRARY_PATH
export TNS_ADMIN=$ORACLE_HOME/network/admin
$ORACLE_HOME/bin/sqlplus /nolog <
act_db.pl
## act_db.pl start here.
#!/usr/bin/perl
#
# $Header: act_db.pl 05-apr-2007.14:21:24 rvenkate Exp $
#
# act_db.pl
#
# Copyright (c) 2007, Oracle. All rights reserved.
#
# NAME
# act_db.pl -
#
# DESCRIPTION
# This perl script is the action script for start / stop / check
# the Oracle Instance in a cold failover configuration.
#
# Place this file in
#
# NOTES
# Edit the perl installation directory as appropriate.
#
# MODIFIED (MM/DD/YY)
# pnewlan 05/25/07 . use grep -w
# rvenkate 04/05/07 - checkin into demo dir
# pnewlan 01/17/07 - Use Environment variables rather than hard code
# - HOME & SID
# pnewlan 11/23/06 - oracle OS user invoker
# rknapp 05/22/06 - Creation
#
$ORACLE_HOME = "$ENV{_USR_ORA_LANG}";
$ORACLE_SID = "$ENV{_USR_ORA_SRV}";
if ($#ARGV != 0 ) {
print "usage: start stop check required \n";
exit;
}
$command = $ARGV[0];
# Database start stop check
# Start database
if ($command eq "start" ) {
system ("
export ORACLE_SID=$ORACLE_SID
export ORACLE_HOME=$ORACLE_HOME
export LD_LIBRARY_PATH=$ORACLE_HOME/lib:$LD_LIBRARY_PATH
export TNS_ADMIN=$ORACLE_HOME/network/admin
$ORACLE_HOME/bin/sqlplus /nolog <
act_listener.pl
## act_listener.pl start here.
#!/usr/bin/perl
#
# $Header: act_listener.pl 05-apr-2007.14:14:24 rvenkate Exp $
#
# act_listener.pl
#
# Copyright (c) 2007, Oracle. All rights reserved.
#
# NAME
# act_listener.pl - action script for the listener resource
#
# DESCRIPTION
# This perl script is the action script for start / stop / check
# the Oracle Listener in a cold failover configuration.
#
# NOTES
# Edit the perl installation directory as appropriate.
#
# Place this file in
#
# MODIFIED (MM/DD/YY)
# rknapp 06/24/07 - fixed bug with multiple listener
# rvenkate 04/05/07 - checkin as demo
# pnewlan 01/17/07 - Use Environment variables rather than hard code
# HOME & LISTENER
# pnewlan 11/23/06 - oracle OS user invoker and listener name
# rknapp 05/22/06 - Creation
#
$ORACLE_HOME = "$ENV{_USR_ORA_LANG}";
$ORA_LISTENER_NAME = "$ENV{_USR_ORA_SRV}";
if ($#ARGV != 0 ) {
print "usage: start stop check required \n";
exit;
}
$command = $ARGV[0];
# start listener
if ($command eq "start") {
system ("
export ORACLE_HOME=$ORACLE_HOME
export ORA_LISTENER_NAME=$ORA_LISTENER_NAME
export TNS_ADMIN=$ORACLE_HOME/network/admin # optionally set TNS_ADMIN here
$ORACLE_HOME/bin/lsnrctl start $ORA_LISTENER_NAME");
}
# stop listener
if ($command eq "stop") {
system ("
export ORACLE_HOME=$ORACLE_HOME
export ORA_LISTENER_NAME=$ORA_LISTENER_NAME
export TNS_ADMIN=$ORACLE_HOME/network/admin # optionally set TNS_ADMIN here
$ORACLE_HOME/bin/lsnrctl stop $ORA_LISTENER_NAME");
}
# check listener
if ($command eq "check") {
check_listener();
}
sub check_listener {
my($check_proc_listener,$process_listener) = @_;
$process_listener = "$ORACLE_HOME/bin/tnslsnr $ORA_LISTENER_NAME";
$check_proc_listener = qx(ps -aef | grep -w "tnslsnr $ORA_LISTENER_NAME" | grep -v grep | head -n 1 | awk '{print \$8,\$9}');
chomp($check_proc_listener);
if ($process_listener eq $check_proc_listener) {
exit 0;
} else {
exit 1;
}
}
## act_listener.pl stop here.
act_resgroup.pl
## act_listener.pl start here.
#!/usr/bin/perl
#
# $Header: act_resgroup.pl 05-apr-2007.14:39:52 rvenkate Exp $
#
# act_resgroup.pl
#
# Copyright (c) 2007, Oracle. All rights reserved.
#
# NAME
# act_resgroup.pl - action script for generic resource group
#
# DESCRIPTION
# This perl script is the action script for a generic resource group
#
# NOTES
# Edit the perl installation directory as appropriate.
#
# Place this file in
#
# MODIFIED (MM/DD/YY)
# rvenkate 04/05/07 - checkin into demo dir
# pnewlan 04/05/07 - Creation
#
exit 0;
## act_listener.pl stop here.
action_scr.scr
## action_scr.scr start here.

#!/bin/sh

# *****************************************************************

# * *

# * Copyright (c) 2002, 2003 Oracle Corporation. *

# * All rights reserved. *

# * *

# * Copyright (c) 1991, 1999, 2002 Digital Equipment *

# * Corporation *

# * *

# * *

# * All Rights Reserved. Unpublished rights reserved under *

# * the copyright laws of the United States. *

# * *

# * The software contained on this media is proprietary to *

# * and embodies the confidential technology of Digital *

# * Equipment Corporation and Oracle Corporation. Possession, *

# * use, duplication or dissemination of the software *

# * and media is authorized only pursuant to a valid written *

# * license from Digital Equipment Corporation and Oracle *

# * Corporation *

# * *

# * RESTRICTED RIGHTS LEGEND Use, duplication, or disclosure *

# * by the U.S. Government is subject to restrictions as set *

# * forth in Subparagraph (c)(1)(ii) of DFARS 252.227-7013, *

# * or in FAR 52.227-19, as applicable. *

# * *

# * *

# *****************************************************************

#

SCRIPT=$0

ACTION=$1 # Action (start, stop or check)

#########################################################################

#

# Main section of Action Script - starts, stops, or checks an application

#

# This script is invoked by CRS when managing the application associated

# with this script.

#

# Argument: $1 - start | stop | check

#

# Returns: 0 - successful start, stop, or check

# 1 - error

#

#########################################################################

#

# Start section - start the process and report results

#

# If the Application Startup Commands (see description above) were used,

# little, if any modifications are needed in this section. If not used,

# you may replace most of the contents in this section with your own

# start procedure code.

#

case $1 in

'start')

echo "Resource STARTED"

;;

#

# Stop section - stop the process and report results

#

# If the Application Stop Commands or Associated Processes (see descriptions

# above) were used,little, if any modifications are needed in this section.

# If not used, you may replace most of the contents in this section with

# your own stop procedure code.

#

'stop')

echo "Resource STOPPED"

;;

#

# Check section - check the process and report results

#

#

# Your application might allow you to implement more accurate process

# checking. If so, you may choose to implement that code here.

#

'check')

echo "Resource CHECKED"

;;

*)

echo "usage: $0 {start stop check}"

;;

esac

exit 0

## action_scr.scr stop here.
6条评论
灰常详细,不错……
这篇文章涵盖了非常多的知识点,我是在as5上做的实验,当初在node2上执行root.sh的时候就挂死在这里,后来又无法在2节点同时mount diskgroup,花了二个星期的时间才搞定这二个问题啊,这篇文章值得收藏。
CRS是免费的吗?
很精妙 能否不使用asm 通过脚本控制存储切换
re 无为而为:可以通过脚本来实现挂存储而不是asm的。注意root权限。
ASM建為CLUSTER的ASM不就不用腳本去另一節點開啟ASM了?